With every installation first comes the design stage. Unfortunately there isn’t a ‘one size fits all’ solution to installing an air conditioning system, and numerous factors have to be considered to find the perfect design.
Even when we can immediately identify the type of system you need, we still have to work out the most efficient, cost-effective and aesthetically pleasing options for you.
Two identically sized rooms can warrant very different solutions depending on their construction, lighting, use, occupancy, equipment, location, accessibility, number of doors, windows, window coverings and even their aspect. Lots of large south facing windows can mean your environment is more akin to a greenhouse in summer, rather than a working office space, and dramatically alter the specification of the required system.
Key stages in the air conditioning design process include:
discuss the clients needs
confirm a time scale
survey the site
identify affecting factors
calculate heating / cooling requirements
select suitable systems & options
check equipment lead times
plan optimum equipment positions
verify design with suppliers
complete installation drawings
submit quote to client
1. Discuss the clients needs:
It is important to ascertain exactly what the client needs and expects. Open plan areas with many occupants pose an entirely different set of needs and expectations to a small office with 1 occupant.
Just take a look around any large office; there will be some staff in short sleeves and others who won’t take their coat off. It’s important to clarify exactly what is practicable and this may mean discussion with more than just 1 person in the office environment.
2. Confirm a time scale:
A simple single split air con system can be installed in less than a day, the same system that has to traverse 6 floors and pass through 5 offices may take 2 weeks. A comprehensive site survey is paramount to ensure that achievable time scales are agreed.
3. Survey the site:
The survey is important to identify any particular issues that may arise. We assess the most feasible positions for units and ensure they could fit, look at containment routes and find the most practicable and direct route. We examine the building’s construction to highlight any difficulties there may be with installation processes, fixing points and penetrations to interior and exterior walls.
It’s necessary to take in to consideration the existing office layout, desk positions, furnishings etc to identify access needs. On a larger install there may be a necessity for storage containers and waste management skips, we need to ensure there is space and provision for these on site. And we liaise with the client regarding access and any needs for out of hours works.
4. Identify affecting factors:
Such as the current heat load in the area affected by existing hvac systems, room size, room construction, ceiling heights, occupancy, lighting, i.t. stations, servers, printers, fax machines, kettles, ovens, fridges, vending machines, windows, sunlight, ambient temperature ranges etc.
5. Calculate heating / cooling requirements:
In addition to the affecting factors we may need to build in a redundancy factor for planned / unplanned building layout & use changes or substantial changes in occupancy. All very important considerations when sizing the system as an oversized system is equally as bad as an undersized system.
Undersized systems won’t achieve the clients needs and expectations and over sized systems are more prone to breakdown due to short-cycling and add significantly to install, running and maintenance costs and as a result, the carbon footprint.
6. Select suitable systems and options:
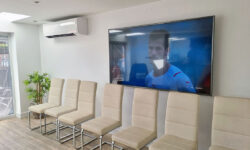
Once requirements are confirmed the type and style of system is chosen. There are many options from split, multi split, vrf and ducted systems. There are also various different styles of units that can be matched to the existing look of a building, inside and out.
With careful design and selection we can achieve a seamless aesthetic and keep the system as discrete as possible. The best looking systems are the ones you don’t notice at all. Other options include remote control type and its accessibility, indoor unit surrounds, condenser mounting options, ceiling diffusers, condenser cages, condensate drip trays and pumps.
7. Check equipment lead times:
With a time scale agreed, the selected equipment must be available. While this is not normally an issue, there are times when new equipment is high demand and suppliers may have a longer than normal lead time. This is checked and the client notified.
8. Plan optimum equipment positions:
Especially relevant is the positioning of the equipment. Firstly it’s confirmed that units will fit in the ideal space, there must be room above the ceiling and suitable fixing points. Indoor units are positioned to give an even spread over the room. Condenser units must have adequate airflow around them, be in an easily serviceable position, ideally out of direct sunlight and when multiple units are used, installed as not to interfere with each other’s air flow.
9. Verify design with suppliers:
We work closely with our suppliers who have an in-depth knowledge of their products. They are involved during most phases of the design process, and will verify a final design will meet the clients needs and expectations. This done by a combination of equipment experience and computer software modelling.
10. Complete installation drawings:
Not all installations require detailed drawings. On most occasions simple layout drawings indicating equipment positions and containment routes are adequate. On larger installations though more complex drawings are required. These show all system positions, containment routes, electrical wiring diagrams and refrigeration network isometrics.
11. Submit quote to client:
Finally, the results of all our hard work, knowledge and due diligence is just part a project quote for the the client. All for free!